Showing posts with label Crafts. Show all posts

Monday, May 13, 2013

Car Play Shirts for Father's Day

There's a reason I haven't been posting on this blog much lately (besides keeping my 4 children alive and somewhat happy).  I've been working on the design and production of my Car Play Shirt!  It's been a lot of fun (and a lot of work) designing this shirt and working out the logistics, and I'm excited to announce that these shirts are now for sale in our Etsy shop!  The Car Play Shirt is the shirt that lets daddy stretch out and relax while playing with the kids.  They make great Father's Day/birthday/Christmas gifts and offer a unique and fun way to interact with your children.  

A couple years ago I posted my tutorial for the car shirt and since then have had an overwhelmingly positive response.  So I decided to redesign the shirts and sell them to those who want one but do not have the time, resources or desire to actually make it.

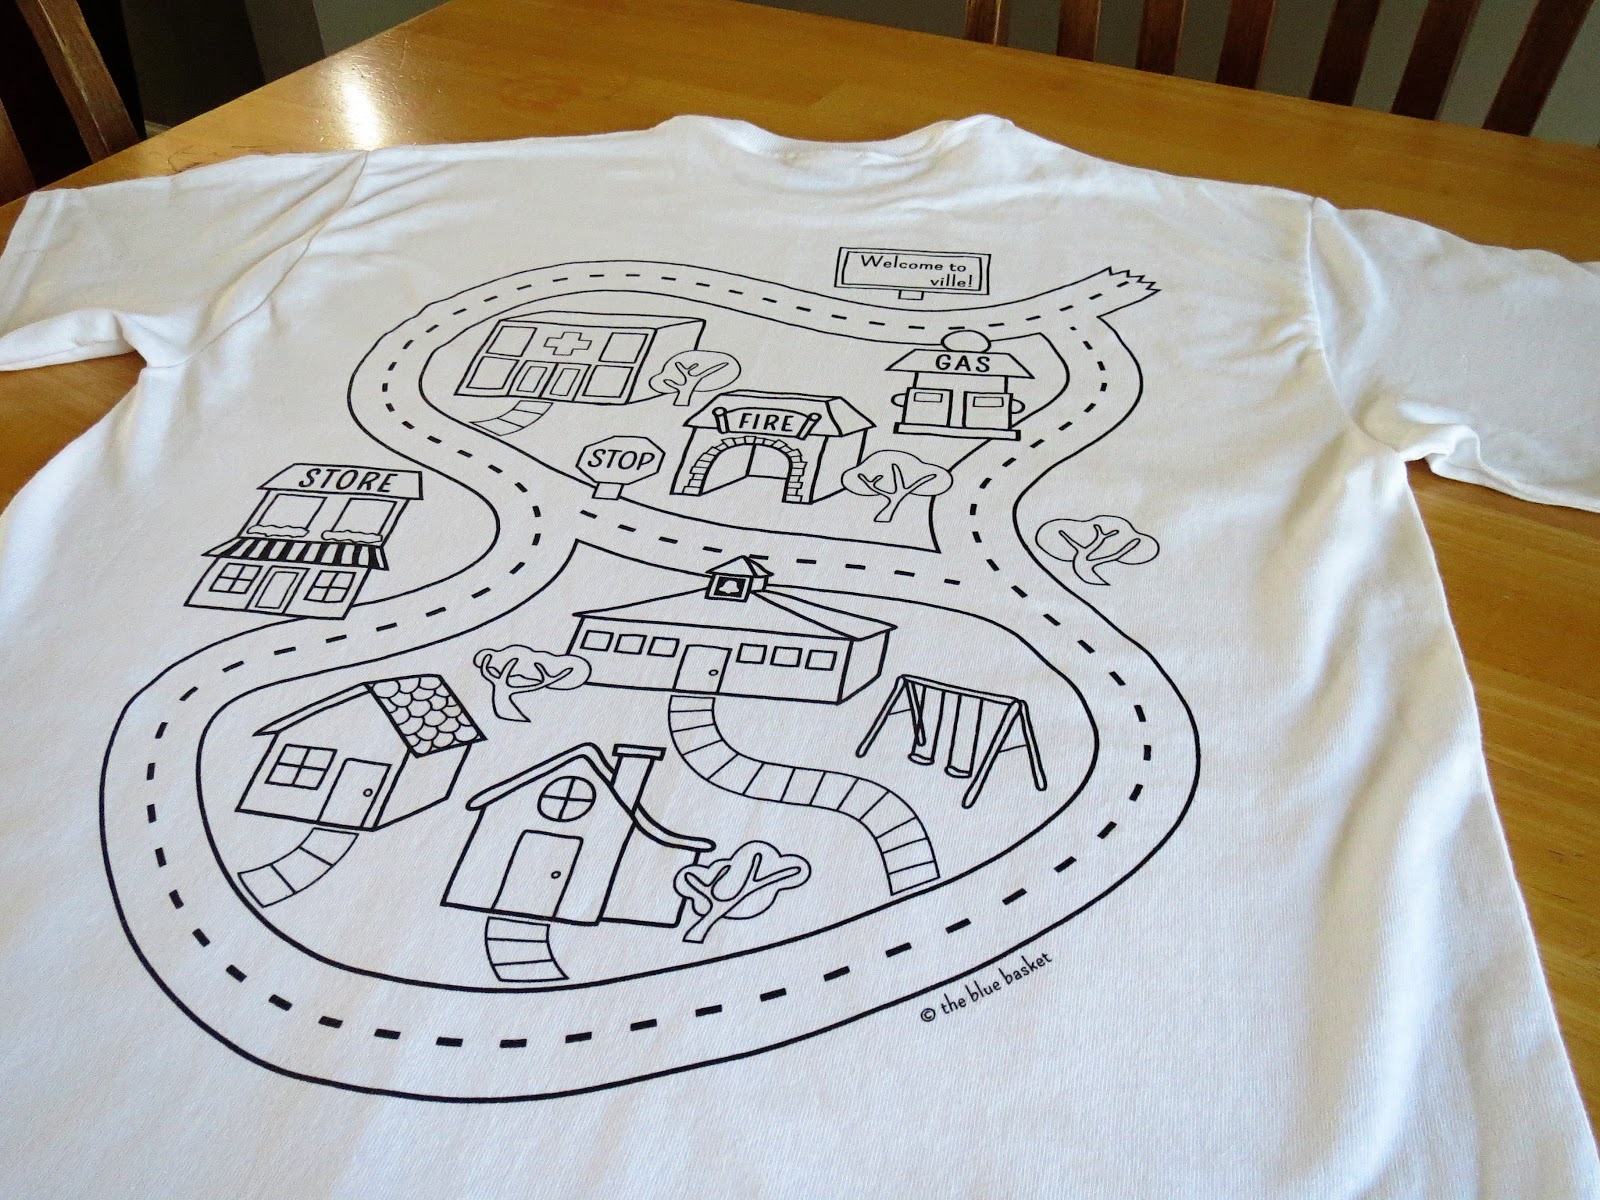
I made two different versions of the shirt: one in full color that is ready to be worn and played on the moment it arrives, and a black and white version that can be colored in with fabric markers or paint, then given to dad/grandpa as a semi-homemade gift.


Both shirts have a welcome sign that allows you to personalize the car shirt by writing in the last name of your family.  "Welcome to Jacksonville!"


With the black and white version the kids can make it their own.  Kids always love playing with things that they put time into making, right?  


And my kids love giving gifts that they help create.  They could hardly wait to get their hands on this shirt.


Start by putting a piece of cardboard or poster board in between the front and back of the shirt so the markers/paint won't bleed through.


Pull the fabric tight around the board and use clothespins or tape to hold it in place.


Pull out your fabric markers and let the kids go at it!


Within seconds of showing the kids the shirt they were choosing the buildings they each wanted to color.  John picked the store and one of the houses, Dan the gas station and the other house, and Joe was assigned the hospital by his brothers.


And I couldn't let the kids have all the fun!  I helped by coloring the fire station.


Give to daddy and let him rest and relax while the kids give him a message with their cars :)

Monday, March 25, 2013

Birthday crown

Friday was Will's birthday.  1 year old!  I can hardly believe it.  We didn't do anything too grand or glorious apart from the traditional present opening and cake gorging.  But we did make him a crown.  I really like the idea of helping the kids make gifts for each other.  It helps them think about the person, and is fun to watch how excited they get when they give the homemade gift.


For this crown, I sewed white fabric onto some vinyl and sewed velcro at either end.  Then I had the kids use fabric paint to decorate it.  I decided to go with something a little longer lasting than just paper.


And here's the birthday boy in all his glory!  It looks like he's super excited to be wearing his crown, right?


Well, truth be told, I think it stayed on his head for a total of 3 seconds before he found it, pulled it off and dropped it on the floor.


We did this about 20 times so I could attempt to get a picture of the beautiful crown, with pink hearts and all.  I guess if nothing else this crown gave us a good game to play.  He certainly liked it (the game).  The velcro makes the crown adjustable, so maybe we'll save it for next year.  I'm just sure he's going to love it.

Tuesday, March 19, 2013

Duct tape wallet

John's class recently took a field trip to the library and he received his very own library card.  He was pretty excited about this, to say the least.  John was wondering where he should keep his card, so we brainstormed a bit and decided to try making a duct tape wallet.  We already had colored duct tape, so it was free (an extra bonus!), and I found an easy to follow tutorial on YouTube.


I love it when I can find projects to work on with the older boys.  It takes a little more creativity and thought to find things they're really interested in doing, but when we do, it's time well spent together.  I had to do most of the cutting, measuring and folding, but John enjoyed being in charge of playing and pausing the video as we worked. 


 Now John can keep dollar bills in his wallet, and coins in his money jar.


We found an old wallet sized picture he could put in the wallet (although he requested I get an updated one with Will in it).


And a nice little pocket for that library card.

Friday, March 15, 2013

Painted money jars

The kids needed a place to keep their money, and I had been wanting to paint jars.  So we combined the two and came up with these money jars.

IMG_0277

I had John, Dan and Joe each pick out 2-4 colors they wanted to use.  They poured about a tablespoon of each color into the bottom of the jar, then rolled the jar around until it was sufficiently covered with paint (we used acrylics).

IMG_0278

I wanted to make sure the paint was completely dry before they used them, so we let them sit for about a week.  For the top, I cut a circle out of some clear plastic, then cut a rectangle to put the coins through.

IMG_0276

I was nervous that the coins would chip the paint, but surprisingly, they haven't chipped a bit.  I hope our jam jars are happy with their new life!  The kids sure love using them.  And I do think they look nice sitting up there on the dresser :)

IMG_0272

Monday, March 4, 2013

A favorite gift for GIRLS

Yes, girls!  Most of my projects, crafts and time is spent on boys, so I love when I can squeeze in some time to make girlie things.  These wrapped leather bracelets have been one of my favorite things to make for Christmas/birthday gifts lately.  They're fairly easy once you get the hang of it, can be strung up in about an hour, and only cost a few dollars per bracelet (depending how much you spend on the beads).  I originally got the idea from my friend Alison and used the tutorial from Rings & Things.  I have only tried making bracelets that wrap around your wrist one or two times, but Alison made a couple that wrap around 4 times, and they are beautiful.  They make for a fun, thoughtful gift.  Now I just need to make some for myself!

IMG_0260 IMG_0262 IMG_0270

Thursday, February 14, 2013

Simple wooden growth chart

A growth chart.  This is something that will be so fun to look at 20 years from now.  My sister Brittney made a vinyl growth chart for me a couple Christmas's ago, but unfortunately the vinyl does not seem to be surviving in a home with 4 little boys.  But the kids have had so much fun standing up to it every so often, measuring themselves to see how much they've grown, so I knew we needed one that could withstand the test of time.

This wooden growth chart proved to be a very simple and quick project.  If I had made it 6 years ago, I probably would have sanded it down, used stencils for the lines and numbers, painted slowly and carefully, and stained it.  Maybe I would have even added some kind of mounting device to the back so it could be attached to a wall.  But times have changed, and it can be a challenge to set aside even an hour to work on a project.  So don't look too closely at my crooked lines and hand-painted numbers.

I bought this piece of wood at Lowe's and had someone cut it there to 6 1/2 feet.  Then I did all of my measurements in pencil (this was the most time consuming part) and used my transfer paper technique to draw on the numbers.  Then I went over everything with black paint and called it good.  I guess I went for the natural look, didn't bother sanding it or staining it.  But I quite like how it turned out.

IMG_0183 IMG_0192
I love the knots in the wood.  I intentionally chose a piece of wood that had them.

All ready to measure these fast-growing kids!  I'm planning on measuring everyone on their birthdays each year.  That way we can compare everyone's height by age.  Now I just need to find a good way to mark their height... markers? paint? wood burning?... I might need to experiment a bit.
IMG_0193 IMG_0194

Friday, August 31, 2012

Reconnecting: bows & arrows

We just returned from a 3 week trip to Utah.  It was wonderful to be with friends and family, but I must say, it's good to be home.  It was a busy 3 weeks as we attempted to see everyone and do everything that we had missed out on over this past year.  Hiking, swimming, family reunions, Park City, Bear Lake, sailing, games, shopping, biking, visiting, running, eating out, play dates, over nighters, birthdays... we somehow managed to pack it all in!  I don't know if anyone else does this, but by the end I felt like I had reconnected with everyone... except my own kids.  And this became obvious by the end when the kids were behaving worse than I had ever seen them.  Lack of structure, lack of sleep, an overdose of family of friends and an underdose of their own mother left them fighting, talking back, whining and disobeying more than ever.

So a few days ago we all finally reconnected by working on one of my favorite projects I've done with them: making bows and arrows.  I've realized that doing crafts, projects or games with my kids is how I connect with them best.  And these have definitely been lacking over the last few weeks.  It was so nice to finally sit down with the older three and work on something that we were all excited about again.

I found the tutorial for these bows and arrows on the blog You Craft Me Up.  It was surprisingly very simple and we were able to put 4 bows and 8 arrows together in one afternoon.  Even with the breaks I had to take to feed Will, keep him happy and get the kids a snack.  And the best part?  All of the supplies only cost me $16!  That's $4 per bow and 2 arrows.  I made one each for John, Dan and Joe, and then one set for John's friend who is having a birthday party next week.  A pretty sweet deal, if you ask me.

 IMG_6895
We made one change to the tutorial we followed: I didn't dare let the kids shoot the sticks around with nothing on the end.  Knowing kids, one of the arrows would find itself in someone's eye.  So I taped a piece of the foam to the end.  It could still hurt if it was shot at someone at close range, but at least it won't cause permanent damage.  I would recommend having a rule to not shoot at people, either way.

IMG_6903 IMG_6894 IMG_6899
On Daniel's bow we taped a piece of PVC pipe to it to rest the arrow on when he shoots.  He was having a hard time aiming the arrow, but this made it very easy.

IMG_6901

The kids couldn't wait to show the neighbor kids their new weapons... sometimes I wonder what I would be making if I had a girl... a doll? a skirt?... But I'm pretty happy making bows and arrows for the time being :)

Thursday, May 31, 2012

Introduction to tie-dye

On Memorial Day we went over to my friend Alison's house, and she invited us to do tie-dyes.  We might just have to make this a Memorial Day tradition, I LOVE how they turned out.  A great way to give old shirts with stains a face lift.

IMG_6082

The older kids all huddled around as Alison demonstrated how to make them.  She bought her dyes from Dharma Trading Co. and followed the instructions on their website.

IMG_6233

John and Dan were more than excited to wear their shirts.  They wanted to put them on as soon as they had been washed and dried.  Then they insisted on wearing them to bed, and Dan even pleaded to wear his the next day.  We might have to make some more of these.

IMG_6046

Tie-dyed onesies could make a fun baby gift.  But we'll be keeping the ones we made for Will :)

IMG_6055

I was super excited how my Moosejaw shirt turned out.  Pete had just recently bought this shirt for me, and I went and got some bleach on it the first time I wore it when I was cleaning the sink.  I was so mad at myself.  So it got the tie-dye treatment in an attempt to cover up the bleach stain.  And now I think I like it even more than before!

Tie dye-Joe and Jess

Thursday, May 24, 2012

Family Home Evening board using transfer paper

This has been on my list of projects to do for more than a year now.  And I finally got around to it!  A Family Home Evening board.  We'll no longer be scrambling around come Monday night deciding who is going to do what.  You can buy these, but they're much cheaper to make.


I started with a piece of wood.  My friend was getting rid of this and asked if I wanted it.  While I didn't need another Christmas decoration, I knew I could use it for something else.  Perfect!  Any old piece of wood will do.

IMG_5792

I have yet to use vinyl letters.  I'm sure they would have worked well for this project, but I didn't want to spend any money if I didn't have to.  So I decided to layout everything on the computer and then trace it on to the board.  This made it so I didn't have to measure anything and saved a lot of time.

FHE board

Then I printed this out, taped it on to the board, which I painted white, and slid some yellow transfer paper between the printout and the board.


Then I traced the letters with a pen.


And they showed up as a light yellow on the board.  So simple!


From there I painted over the large letters with black paint and drew over the small letters with a thin permanent marker.  Then I screwed some hooks into the board, drilled a hole in 8 small circles, and wrote our names on the circles.  I was going to paint the circles, but I couldn't decide what color to do.  So to keep it from sitting there for who knows how long unfinished, I did a quick job with the names, knowing that I could paint over them later if I wanted to.


I'm looking forward to more organized family nights!

Wednesday, May 9, 2012

Mother's Day gift... garden markers

Living away from family forces me to be on the ball with things like Mother's Day gifts.  Normally I would be whipping something together the night before, but now I have to actually plan ahead so it has time to get there.  This year I tried to think of gifts that were thoughtful but also useful.  Gifts that the kids could help with but that wouldn't just clutter up the house.  My mother-in-law loves spending time working in the yard, so we came up with the idea to make garden markers for her vegetable garden.

IMG_5742
IMG_5760

I wanted to keep it as simple and natural looking as possible.  I cut the wood and nailed the pieces together, John wrote the letters, Pete used a wood burner to trace the letters, and Dan stained the wood.

garden markers-prep IMG_5730

I think they turned out pretty cute!  I love little kid handwriting.  I can't wait to see how they look in her garden.

IMG_5751 IMG_5743 IMG_5758

Now I want to make some for our garden!
Related Posts Plugin for WordPress, Blogger...