Monday, September 26, 2011

Nature inspired fall decorations

Fall is here! And the reason I know it's here is because my kids point out every tree that's starting to change colors and talk about Halloween at least a few times each day. There's nothing like kids to help you get excited for new seasons and upcoming holidays! I thought I'd share a few inexpensive and easy Fall decorations we made that were inspired by nature...

Fall leaves
IMG_2482
We collected leaves on a walk, then tied them around a candle and a large jar with a candle inside. You could also tie them around mason jars or vases with something inside.

Grass
IMG_0845
Our neighbor gave me this idea a few years ago: to cut a bunch of tall grass and stick it in a vase. He gave the advice to spray the ends with hairspray so they don't get everywhere. So simple!

Squash
IMG_0836
This is one my favorites, mostly because you get to eat them when Fall is coming to a close :) I haven't come across an ornamental squash that wasn't edible yet. They'll last a couple months out on your counter, in a basket, in a bowl, wherever you put them, and add a whole lot of color. Here's how we like to cook them:

Cut the squash in half and spoon out the seeds. Fill the hole with a slab of butter and either salt or brown sugar (Pete likes salty and I like sweet, so we always do one of each). Put in 350 degree oven for about 1 hour. Then mix the insides together and enjoy!
squash

What are your favorite Fall decorations?

Friday, September 23, 2011

Tutorial: "I'm going to be a Big Brother!" t-shirt

Our littlest guy is due to be a big brother in March! Wahoo! To make the announcement we had Joe wear this shirt and sent a picture of him to family and friends (Is that lame to tell people you're pregnant in a text? Oh well, that's what we did.)


If you're interested in making your own Big Brother shirt or Big Sister shirt, here's how I did it...

Thursday, September 22, 2011

Tutorial: burp cloths

My all-time favorite baby gift to give is homemade burp cloths. They're something that every mom needs, whether it's their first baby or their 5th (burp cloths are used way too much to survive through more than a few babies!) I like to make a lot of these at one time so I have a quick but thoughtful gift whenever anyone I know has a baby. They're inexpensive, easy and quick to make, and who doesn't love a homemade gift?


This TUTORIAL might bore you sewers out there. This sewing project would definitely fit in the "beginners" category. But those who like step-by-step instructions for even the easiest project, read on...

Tuesday, September 20, 2011

Colored soups

If you've got anti-vegetable eaters like I do, then this soup is for you! Actually, if your kids love veggies then this is for you too! My kids will eat fruit by the handfuls but have become the pickiest little vegetable eaters. Does anybody else have this problem? They'll occasionally try a cooked carrot or two, but that's about as close as they get. Thus the need for our COLORED SOUPS. Last night I made "green soup" (aka broccoli soup), and they all loved it! Joe, who has become the pickiest eater of the bunch, downed his entire bowl and then moved on to his brothers. Ha! I tricked them all! And I felt pretty good about it :)

IMG_2376

You can also make red (tomato) soup, orange (squash/carrot) soup, white (potato) soup, yellow (corn) soup, the options are endless! Here's what I generally do to make the soup:

1. Saute half an onion with a couple tablespoons of butter in a large pot.
2. When the onion is nicely browned, add the veggie (diced) and 2-4 cups of water or chicken broth (if making tomato soup you won't need a lot of water).
3. Add whatever seasonings you like then put on a lid and let simmer until the veggies are soft (30 minutes usually does it).
4. Puree the soup in a blender and put back in the pot.
5. I usually add a cup or two of milk at the end to thin it out a bit and occasionally 1 or 2 more tablespoons of butter (butter always makes it better, right?)

Pretty simple! Serve with warm bread, biscuits or rolls, and you've got a healthy, nutritious meal your kids are sure to love!

Monday, September 12, 2011

Tutorial: car shirt

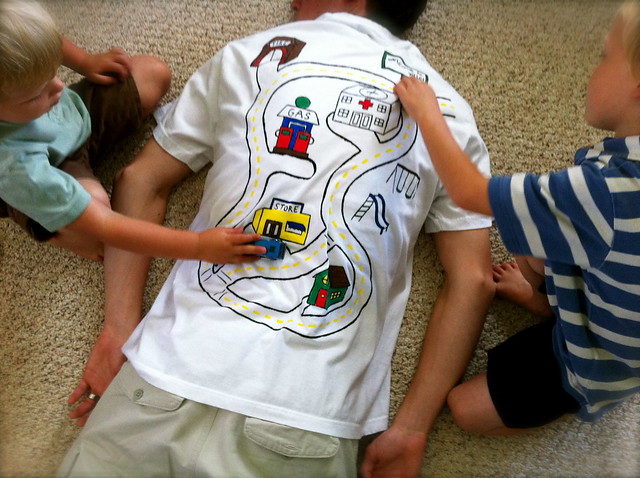
The Car Play Shirt is the shirt that lets daddy stretch out and relax while playing with the kids!  They make great Father's Day/birthday/Christmas gifts (for grandpa's too!) and offer a unique and fun way to interact with your children.

I first made one of these for my husband several years ago using Sharpies, and it has become a favorite activity to do with dad when he comes home from work or on lazy Saturday mornings.

For those who want one of these shirts but do not have the time, resources or desire to actually make it, we are now selling them in our Etsy shop!  We are offering both a full color version and a black and white version that can be colored in by your kids (or you) at home.  Check us out!  And for those who are interested in the tutorial, read on...


Following is a short 
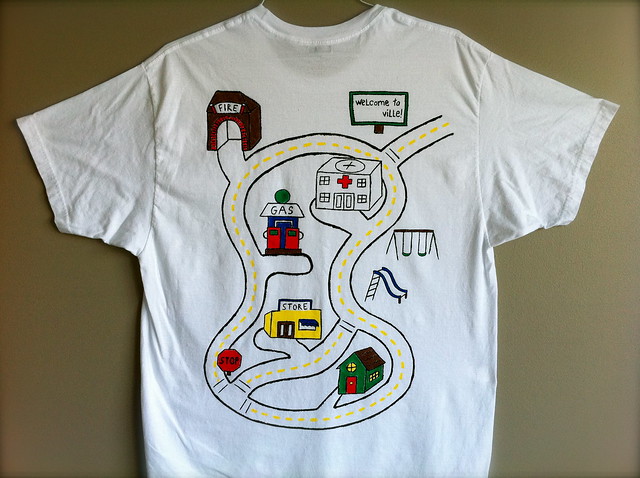
TUTORIAL so you can make your own car shirt.  I have printouts of the map I created and everything you'll need to know.


What you'll need:
- Plain white shirt (you can buy these at Walmart in a pack of 2 or 3 for just a few dollars each)
- Printer and paper (if you want to use the map I created)
- Fabric paint or fabric markers
- Cars to drive on your map!

If you'd like to use the map I created, the following images can be printed. Each quarter of the map needs to be printed on an 8 1/2 x 11 sheet of paper. If you don't want to use my map, then get creative and design your own! I think it works best to design it on paper first, and then trace it onto your shirt (the following steps will explain how to do this).

Click on the images below, drag them to your desk top and print them.


Once you've printed each quarter, tape them together.


Then slide the paper in between the front and back of the shirt, with the back of the shirt facing up. This also protects the paint from bleeding through to the front.


Start tracing! I used fabric paint, but just a warning, it took FOREVER! About 3 hours longer than I had hoped :) Next time I make one I want to try fabric markers. It seems like they would make smoother lines and would save a lot of time.


And ta-da! You've created your very first car shirt!


**This tutorial is meant for individual use only.  Please do not use my images for the purpose of selling shirts for profit.  Thank you!

Wednesday, September 7, 2011

Car Shirt GIVEAWAY!

** This giveaway is closed ** But you make your own! I have posted the tutorial here.

This is probably the best gift you could ever give your husband (ok, maybe not the best, but pretty close!) And it could be yours! I made one of these for Pete a couple years ago and he has gotten hours and hours of use out of it. All it is is a map painted onto the back of a shirt for the kids to drive their cars on. If daddy comes home exhausted but still wants to play with the kids, he can throw this shirt on and get a nice 20 minute massage from the kids hot wheels. I even whipped this shirt out one afternoon when the 2 older kids were wanting to do something with me and snuck in a 10 minute power nap :)

IMG_2237

The winner of this drawing will receive the car shirt shown (x-large) PLUS 2 new Hot Wheels cars! And since there are probably 3 or 4 people who read this blog, you have a very high chance of winning! :)

To enter the giveaway you must:
* Be a follower of this blog and leave a comment on the blog (required)
* For an extra entry you can like this page on Facebook (leave another comment on the blog)
Entries must be in by Sunday night! Winner will be announced Monday.

IMG_2144

These make great birthday, Christmas and Father's Day gifts.
Good luck!!!
Related Posts Plugin for WordPress, Blogger...