Showing posts with label Tutorial/printout. Show all posts

Thursday, May 24, 2012

Family Home Evening board using transfer paper

This has been on my list of projects to do for more than a year now.  And I finally got around to it!  A Family Home Evening board.  We'll no longer be scrambling around come Monday night deciding who is going to do what.  You can buy these, but they're much cheaper to make.


I started with a piece of wood.  My friend was getting rid of this and asked if I wanted it.  While I didn't need another Christmas decoration, I knew I could use it for something else.  Perfect!  Any old piece of wood will do.

IMG_5792

I have yet to use vinyl letters.  I'm sure they would have worked well for this project, but I didn't want to spend any money if I didn't have to.  So I decided to layout everything on the computer and then trace it on to the board.  This made it so I didn't have to measure anything and saved a lot of time.

FHE board

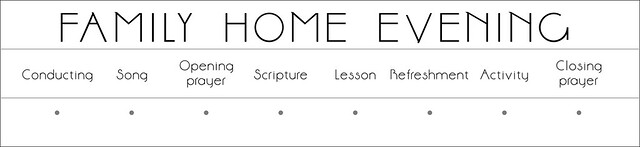
Then I printed this out, taped it on to the board, which I painted white, and slid some yellow transfer paper between the printout and the board.


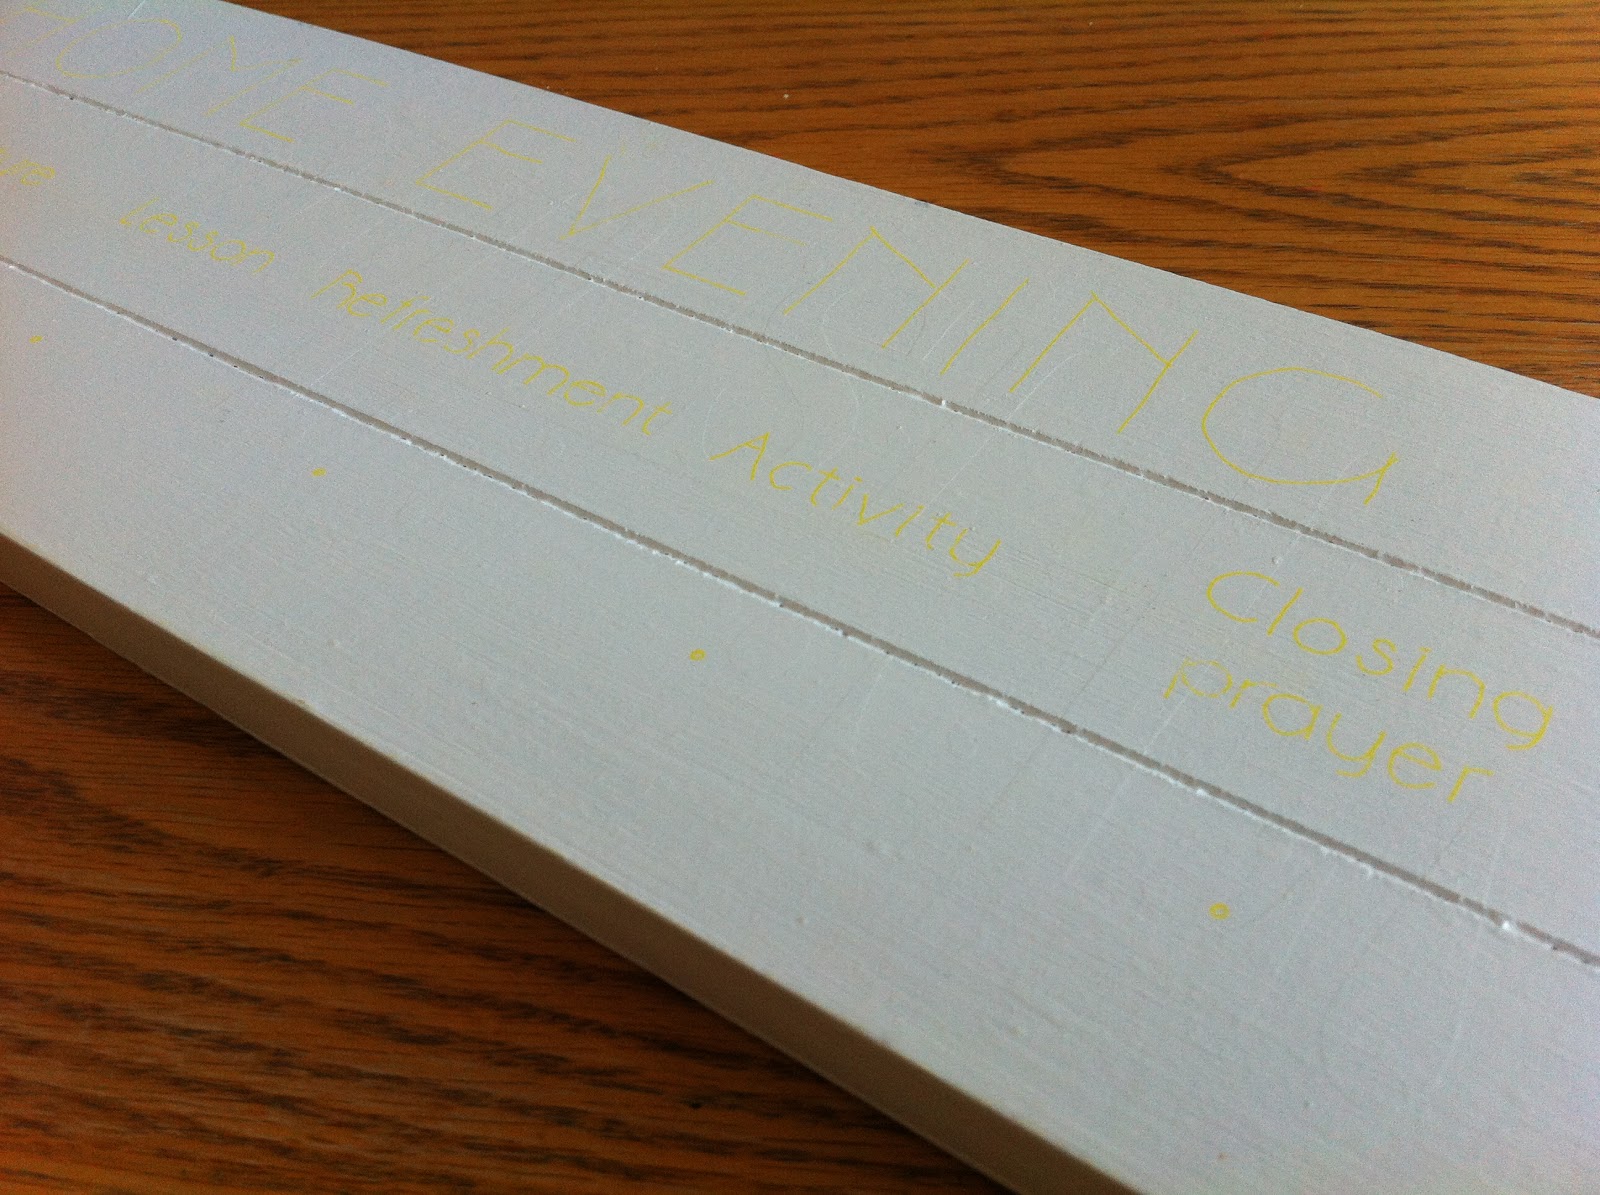
Then I traced the letters with a pen.


And they showed up as a light yellow on the board.  So simple!


From there I painted over the large letters with black paint and drew over the small letters with a thin permanent marker.  Then I screwed some hooks into the board, drilled a hole in 8 small circles, and wrote our names on the circles.  I was going to paint the circles, but I couldn't decide what color to do.  So to keep it from sitting there for who knows how long unfinished, I did a quick job with the names, knowing that I could paint over them later if I wanted to.


I'm looking forward to more organized family nights!

Tuesday, March 13, 2012

Babysitter notes dry erase board

I got this idea from a small boutique in our town a few months ago. A dry erase board for babysitter notes. Why haven't I thought of this before?! Brilliant. You write all of the information that isn't going to change right on the paper, then stick it in a magnetic frame and use a dry erase marker to write what time you should be home and any special instructions (what to have for dinner, bedtime routine, etc.) If there's an emergency or if the babysitter has a question, she can simply refer to this.

IMG_4640

Feel free to print mine, or create your own!

Monday, March 5, 2012

Tutorial: reusable food bags

I have slowly been collecting the transparent, plastic bags that sheets, toys and other things come packaged in. Never throw these away! There are SO many different ways to use them (an obvious one being to store other toys, art supplies, or clothes in.) I used a few of these bags for the windows in our table fort, and have been meaning to turn a few more into reusable food bags for quite some time. I was finally forced to when we started running low on sandwich bags, and I was determined to not buy anymore. Lately I have noticed how much waste goes out of our house, and how many things get used once only to be thrown away. So this is one (very small) attempt to "reduce" and "reuse" (which, in my opinion, is even more important than "recycle"... but more on that another time.)

IMG_4440

I plan to use these bags for any dry foods (crackers, cookies, etc.) and continue using small plastic containers for the more messier foods that would be harder to rinse out (like apples or oranges). But we'll still keep a box of sandwich bags around... they're nice to have when sending people home with cookies or to use when traveling, but hopefully with these bags we can cut back a little bit.

Tuesday, February 28, 2012

Tutorial: how to cut boys hair

Yesterday was hair cutting day. One of the many things I wanted to get done before this baby comes (although I could still have another 4 weeks... and by that time they'd be close to needing another hair cut... oh well!) I've cut Pete's hair ever since we were married, so I never thought twice about not doing the kids myself. It saves money (especially with a growing family), I don't have to load the kids in the car and take them anywhere, you can do it on your own schedule, and, once you have it down, really doesn't take too much time. It takes me 15-20 minutes per kid. I am in no way claiming to be a master of cutting boys hair... this is just the way that I have found works for me, I'm sure there are many other ways to do it (and let's be honest, probably better ways!) But if you're new to cutting boys hair, here's somewhere to start...


Monday, February 6, 2012

Marshmallow/Pom Pom Shooter

You may have seen this idea floating around on Pinterest. Well, so did we, and we decided to give it a try. We had all the supplies, so this gave the kids and I an hour of free entertainment!

IMG_3965

We made just a few changes to the tutorial we found here...

Saturday, January 28, 2012

Homemade laundry detergent

I had never even heard or thought of making your own laundry detergent until my friend Nicole posted the recipe she uses a couple months back. Ever since then I have been excited to make my own and have waited patiently for our large box of store-bought detergent to run out. Why make your own laundry detergent? It can save you money, it can be a fun and satisfying project to do with your kids (or by yourself), it's quick and very easy, and, most importantly to me, it is great for kids/adults with sensitive skin. Joe and Dan both have eczema that comes and goes, and I have been meaning to try using a gentler detergent for quite some time. I also wanted a skin-sensitive detergent for when the baby comes, so I'm happy to now check that off my list. Read on for the recipe! You'll be amazed at how simple it is.

IMG_3807

Saturday, January 14, 2012

New Year Organization: the morning routine

This isn't really house organization, but I thought I'd throw it in here anyway, because I love what it has done for us. This list of things to do has made it so I don't have to nag my kids all morning to get dressed, make their beds, brush teeth... blah, blah, blah. John, who loves routine and lists, has especially taken to it and has rubbed off on his brothers. If the kids want to watch TV or play the computer in the morning I simply ask them if they have finished the things on their list, and that distracts them... honestly, pretty much all morning. It doesn't take them all morning to complete these things, there are just always toys they run into along the way or other things they find to do before they ask about screens again. I'm hoping that we can stick with this long enough that it will just become habit for the kids to get themselves ready without me telling them to... doesn't hurt to wish, right?

IMG_3668

Everyone probably has a different routine in the morning, but you can print this one I made below if you want to. I made little illustrations to go along with each task for the non-readers in the family, so I don't have to read it to them.

Thursday, December 15, 2011

Homemade ornaments

Last week the kids and I made these ornaments for our Christmas tree and to give to grandparents. Dan helped me make them while John was at school and Joe was sleeping... Dan's becoming my craft/baking buddy in the afternoons, I love it! He loves following me around and helping me with whatever I'm doing. Then the next morning the kids all got busy painting them.

John star

Here's how you make them:

* Combine 4 cups flour, 1 cup salt, and 1 1/2 cups water in the mixer and knead for 10 minutes (or knead by hand for 15-20).
* Roll dough out and cut out with cookie cutters or use kids hands to make handprints (if you need to roll out dough a second time you can add a little water to soften it a bit).
* Use a straw to poke a hole in the top so it can be hung and prick with a toothpick to prevent air bubbles.
* Transfer shapes to a baking sheet that has been sprayed with nonstick spray and bake at 300 degrees for about 1 hour (times may differ depending on the thickness of the dough).
* Paint away!
* You can glue felt or cardstock to the back for a more finished look, then hang with a piece of string.

IMG_3348
Boys painting ornaments
IMG_3382

Friday, December 9, 2011

20-Minute Santa Hats

Last week, while John was at school and Joe was down for his nap, Dan suggested we (I) make some Santa hats. We had about an hour before John was going to get home from school, so I set to work and came up with a hat that could double as a hat to wear out in the cold. I had some fleece leftover from the kids Christmas PJ's, so I used that. It even came out looking somewhat Santa-ish, and I was finished with all 3 in 1 hour! Dan and Joe wore their hats for the rest of the afternoon and have worn them on many outings. Joe has even taken a couple naps with his hat on, so I consider it time well spent.

IMG_3304
IMG_3300

Read ahead for the tutorial...

Sunday, November 27, 2011

Christmas dice game

I found this idea at Pre-K Pages and decided to make my own printout to use. It's the perfect game for a toddler who is learning his numbers. John and Dan both loved it and understood it enough that they could play by themselves (they played it one afternoon while I snuck in a quick power nap!) You simply take turns rolling a dice and cross the numbers off as you go. The first to have his numbers crossed off wins! Try it with your toddler!

IMG_3203
IMG_3197

Click on the image below and print your own!

Thursday, October 27, 2011

Tutorial: toddler trick-or-treat bags

A couple years ago I made some trick-or-treat bags for my kids that were basically two pieces of material sewn together with a handle on each side. But I quickly realized that these bags weren't going to work very well: they dragged on the floor when the kids were holding them down by their side, and my youngest wasn't coordinated enough to open the bag with both handles to put the candy in. So this year I got a little smarter and made (what I think is) the perfect trick-or-treat bag for young hands! They have one handle, a nice big opening that stays open so the candy can be easily dropped in, and they're short enough that they don't drag when held down to your side. AND they still have plenty of room to fill up with candy. The perfect bag!

trick-or-treat bags
Read on for the tutorial...

Friday, September 23, 2011

Tutorial: "I'm going to be a Big Brother!" t-shirt

Our littlest guy is due to be a big brother in March! Wahoo! To make the announcement we had Joe wear this shirt and sent a picture of him to family and friends (Is that lame to tell people you're pregnant in a text? Oh well, that's what we did.)


If you're interested in making your own Big Brother shirt or Big Sister shirt, here's how I did it...

Thursday, September 22, 2011

Tutorial: burp cloths

My all-time favorite baby gift to give is homemade burp cloths. They're something that every mom needs, whether it's their first baby or their 5th (burp cloths are used way too much to survive through more than a few babies!) I like to make a lot of these at one time so I have a quick but thoughtful gift whenever anyone I know has a baby. They're inexpensive, easy and quick to make, and who doesn't love a homemade gift?


This TUTORIAL might bore you sewers out there. This sewing project would definitely fit in the "beginners" category. But those who like step-by-step instructions for even the easiest project, read on...

Monday, September 12, 2011

Tutorial: car shirt

The Car Play Shirt is the shirt that lets daddy stretch out and relax while playing with the kids!  They make great Father's Day/birthday/Christmas gifts (for grandpa's too!) and offer a unique and fun way to interact with your children.

I first made one of these for my husband several years ago using Sharpies, and it has become a favorite activity to do with dad when he comes home from work or on lazy Saturday mornings.

For those who want one of these shirts but do not have the time, resources or desire to actually make it, we are now selling them in our Etsy shop!  We are offering both a full color version and a black and white version that can be colored in by your kids (or you) at home.  Check us out!  And for those who are interested in the tutorial, read on...


Following is a short TUTORIAL so you can make your own car shirt.  I have printouts of the map I created and everything you'll need to know.


What you'll need:
- Plain white shirt (you can buy these at Walmart in a pack of 2 or 3 for just a few dollars each)
- Printer and paper (if you want to use the map I created)
- Fabric paint or fabric markers
- Cars to drive on your map!

If you'd like to use the map I created, the following images can be printed. Each quarter of the map needs to be printed on an 8 1/2 x 11 sheet of paper. If you don't want to use my map, then get creative and design your own! I think it works best to design it on paper first, and then trace it onto your shirt (the following steps will explain how to do this).

Click on the images below, drag them to your desk top and print them.


Once you've printed each quarter, tape them together.


Then slide the paper in between the front and back of the shirt, with the back of the shirt facing up. This also protects the paint from bleeding through to the front.


Start tracing! I used fabric paint, but just a warning, it took FOREVER! About 3 hours longer than I had hoped :) Next time I make one I want to try fabric markers. It seems like they would make smoother lines and would save a lot of time.


And ta-da! You've created your very first car shirt!


**This tutorial is meant for individual use only.  Please do not use my images for the purpose of selling shirts for profit.  Thank you!

Thursday, August 11, 2011

Tutorial: making a little boy tie from a grown-up tie

If your husband is like mine, he has a bunch of ties that are either stained or that he simply doesn't like and therefore never wears. So put them to better use and turn them into little boy ties! Read on for the tutorial.

ties 1

Friday, August 5, 2011

Grocery list pad printout

I recently started keeping this grocery list pad on my fridge and have loved it. These are super easy to make! I took the file into Kinko's, had them do it all: print, cut and glue the top. All for just a few dollars. Then I stuck a magnet to the back. If you're interested, here's the file:


Happy shopping!

And the winner of the grocery list pad is...


Eliza! Congrats :) You'll be receiving your very own grocery list pad in the mail early next week.
Related Posts Plugin for WordPress, Blogger...